For this tutorial, there are 7 Things for you to do. Each Thing will show you another web tool. There are many places for you to explore, experiment with, and think about creative ways to use this in your work or to collaborate with other educators.
#1 Open a Gmail account
#2 Create your own blog, then post about it
#3 Share your blog
#4 Explore Flickr and learn more about this popular image sharing tool
#5 Flickr Fun - Mashups & Tools
#6 Make life 'really simple' with RSS
#7 Keep feeding!
Feel free to look around this web site - it is a place for self-directed and shared learning. If you get stuck, ask the person next to you first.
Tuesday, September 18, 2007
#7 Keep feeding!
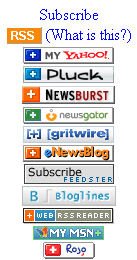
Now that you have an RSS Reader (your Bloglines account), you can begin adding other feeds that interest you. There are several ways you can locate RSS feeds:
When visiting your favorite websites -- look for RSS feed icons that indicate the website provides it. Often a feed icon will be diplayed somewhere in the navigation of the site.
Use Blogline's Search tool - Bloglines recently expanded search tool lets you search for news feeds in addition to posts, citations and the web. Use the Search for Feeds option to locate RSS feeds you might be interested in.
Check out the top "Edublog" award-winning blogs and school library blogs.Other Search tools that can help you find feeds:
Feedster - One of the largest collections of RSS feeds, Feedster lets you search for feeds in three categories: news, blogs & podcasts
Topix.net - This search tool allows you to locate recent newsfeed items based upon keyword or phrase searching. The tool focuses specifically on news and media outlets RSS feeds for information, not weblogs
Syndic8.com - Syndic8 is an open directory of RSS feeds that contains thousands of RSS feeds that users have submitted.
Technorati - Technorati is a popular blog finding tool that lets you search for blogs. Since RSS feeds are inherent to all blogging tools, Technorati Blog Search can help you find RSS feeds for topic specific blogs you may be interested in.
Google Blog Search - See what appears when you search "learning 2.0"
Blog Pulse - Tracks conversations (try putting Web 2.0 to see who is talking about this topic)
Additonal Resource: Technorati Tutorial on finding and adding your blog
Discovery Exercise:
Explore some of the search tools noted above that can help you locate some news feeds.
Create a blog post about your experience. Don't know what to blog about? Here some questions to think about ...Which method of finding feeds did you find easiest to use? Which Search tool was the easiest for you? Which was more confusing? What kind of unuseful feeds did you find in your travels? Or what kind of unusual ones did you find? What other tools or ways did you find to locate newsfeeds?
#6 Make Life “really simple” with RSS & a news reader
You’ve heard of RSS? You’ve seen those small funny orange tags on websites? You’ve heard co-workers and acquaintances swear by it, but still have no idea what RSS is? Well don’t worry, according to a this survey you’re still in the majority, but this is changing rapidly.
In the information world, RSS is not only revolutionalizing the way news, media and content creators share information, but it also is swiftly changing the way everyday users are consuming information.
RSS stands for “Really Simple Syndication” and is a file format for delivering regularly updated information over the web. Just think about the websites and news information sources you visit everyday. It takes time to visit those sites and scour the ad-filled and image-heavy pages for just the text you want to read, doesn’t it? Read more about RSS here.
Now imagine if you could visit all those information sources and web pages in just one place and all at the same time … without being bombarded with advertising… without having to search for new information on the page you’d already seen or read before… and without having to consume a lot of time visiting each site individually. Would that be valuable to you? Well, it’s available now through a newsreader and RSS. This week’s discovery exercises focus on learning about RSS news feeds and what free tools you can use to do this.
Discovery Exercise:
1. Follow these discovery exercises to set up your own, personalized RSS feed reader. Learn about the difference between RSS feed readers, Bloglines, and Google Reader.
2. Create a free "RSS aggregator" account from either Bloglines or Google Reader and subscribe to at least 5 newsfeeds to your reader. [BLOGLINES. Here are the steps for creating an account in BLOGLINES. See Using Bloglines Tutorial steps 1-3 for instructions. See also a short video on YouTube on how to add feeds ; GOOGLE READER. You may prefer to set up an RSS aggregator in Google Reader. Tutorials include: Google Reader Tour, video tutorial#1 or #2.]
3. Create a post in your blog about this exercise. Don’t know what to blog about? Think about these questions: What do you like about RSS and newsreaders? How do you think you might be able to use this technology in your school or personal life? How can libraries use RSS or take advantage of this new technology?
Optional: If you're up to the challenge, you can provide the URL address to your public bloglines account (find where to find this below)
Newsfeeds to add to your reader:
CNET Video: RSS – Feel the Need for Feeds (3:32) – a good over view of what RSS is and the benefits to users.
Feed Me: A gentle introduction to Internet feeds - a good tutorial from Palinet, a library cooperative
What is RSS? Video by Common Craft. See other similar videos.
How to Make your RSS Feeds Pop! Check your local newspaper and discover if they have an RSS feed you can subscribe to.
Additional Bloglines news feed subcription information · Your co-workers or members of the Virtual Services Task Group - tap into their knowledge and experience with RSS feeds and readers.
Post about usefulnesss of Google Gears
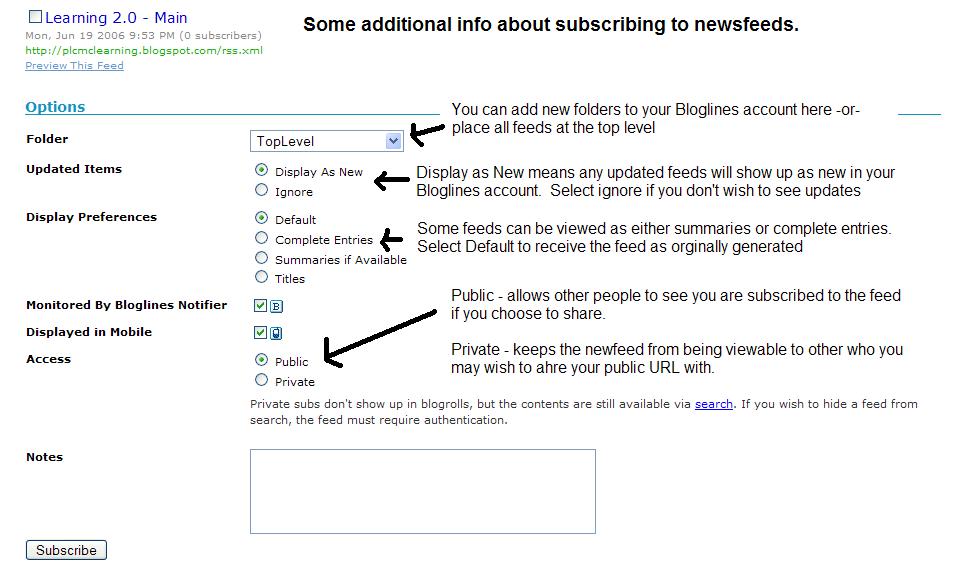
How to find your public Bloglines URL:
1. Click on the Share tab within your Bloglines account
2. Scroll down the right screen pane and locate the public URL. Why have a public account? To share blog rolls with others, of course.
In the information world, RSS is not only revolutionalizing the way news, media and content creators share information, but it also is swiftly changing the way everyday users are consuming information.
RSS stands for “Really Simple Syndication” and is a file format for delivering regularly updated information over the web. Just think about the websites and news information sources you visit everyday. It takes time to visit those sites and scour the ad-filled and image-heavy pages for just the text you want to read, doesn’t it? Read more about RSS here.
Now imagine if you could visit all those information sources and web pages in just one place and all at the same time … without being bombarded with advertising… without having to search for new information on the page you’d already seen or read before… and without having to consume a lot of time visiting each site individually. Would that be valuable to you? Well, it’s available now through a newsreader and RSS. This week’s discovery exercises focus on learning about RSS news feeds and what free tools you can use to do this.
Discovery Exercise:
1. Follow these discovery exercises to set up your own, personalized RSS feed reader. Learn about the difference between RSS feed readers, Bloglines, and Google Reader.
2. Create a free "RSS aggregator" account from either Bloglines or Google Reader and subscribe to at least 5 newsfeeds to your reader. [BLOGLINES. Here are the steps for creating an account in BLOGLINES. See Using Bloglines Tutorial steps 1-3 for instructions. See also a short video on YouTube on how to add feeds ; GOOGLE READER. You may prefer to set up an RSS aggregator in Google Reader. Tutorials include: Google Reader Tour, video tutorial#1 or #2.]
3. Create a post in your blog about this exercise. Don’t know what to blog about? Think about these questions: What do you like about RSS and newsreaders? How do you think you might be able to use this technology in your school or personal life? How can libraries use RSS or take advantage of this new technology?
Optional: If you're up to the challenge, you can provide the URL address to your public bloglines account (find where to find this below)
Newsfeeds to add to your reader:
- San Jose Mercury News Feeds (pick at least one)
- Reader’s Club new review feeds
- Unshelved - Library cartoon feed
- Maybry Middle School, Georgia - example RSS feed
- Westwood School, Georgia - example RSS Calendar Feed
CNET Video: RSS – Feel the Need for Feeds (3:32) – a good over view of what RSS is and the benefits to users.
Feed Me: A gentle introduction to Internet feeds - a good tutorial from Palinet, a library cooperative
What is RSS? Video by Common Craft. See other similar videos.
How to Make your RSS Feeds Pop! Check your local newspaper and discover if they have an RSS feed you can subscribe to.
Additional Bloglines news feed subcription information · Your co-workers or members of the Virtual Services Task Group - tap into their knowledge and experience with RSS feeds and readers.
Post about usefulnesss of Google Gears
How to find your public Bloglines URL:
1. Click on the Share tab within your Bloglines account
2. Scroll down the right screen pane and locate the public URL. Why have a public account? To share blog rolls with others, of course.
#5 Flickr Fun - Mashups and Tools
Like many web 2.0 sites, Flickr has encouraged other people to build their own online applications using images found on the site. Through the use of APIs (application programming interfaces), many people have created third party tools and mashups* that use Flickr images. Here is just a sampling of a few …
· Mappr - takes Flickr images and allows you to paste them on a map
· Flickr Color Pickr - lets you find public photos in Flickr that match a specific color.
· Montagr – create a photo mosaics from photos found on Flickr.Discover more mashups, web apps, and Flickr tools.
Discovery Exercise:
Your discovery exercise for this Thing is to:
Explore some of the fun Flickr mashups and 3rd party tools that are out there. Create a blog post about one that intrigues you. You might want to check out FD Toys’ Trading Card Maker. And there’s a ton of librarians out there that have created their own Librarian Trading Card.
So have some fun discovering and exploring some neat little apps. If you are up to the challenge while you’re at it, create a trading card of your own. :) or a movie poster or magazine cover from this Flickr site.
* Mashup Note: Wikipedia offers some great articles that explain mashups. Basically they are hybrid web applications that take features from one application (like Flickr) and mash it up with another (like a map) In this example, you get Mappr (http://mappr.com)
#4 Explore Flickr and learn more about this popular image sharing site
Photo sharing websites have been around since the 90s, but it took a small startup site called Flickr (now owned by Yahoo) to catapult the idea of “sharing” into a full blown online community.
Flickr uses "tags" or what we would call keywords to help identify and search for photos.For this discovery exercise, you are asked to take a good look at Flickr and discover what this site has to offer. Find out how tags work, what groups are, and all the neat things that people and other libraries (list also here) are creating thanks to Flickr.
Discovery Exercise:
In this discovery exercise, you have two options…
a. Take a good look around Flickr and discover an interesting image that you want to blog about. Be sure to include either a link to the image or if you create a Flickr account, you can use Flickr's blogging tool to add the image in your post. Another option you have for including images in your post is to use Blogger's photo upload tool.
--OR--
b. If you are up to an easy challenge ... create a Free account in Flickr and use your organisation's digital camera to capture a few pictures of something at your school. Upload these to your Flickr account and tag at least one of the images “7 Things @ EIT” and mark it public. Then create a post in your blog about your photo and experience. Be sure to include the image in your post. Once you have a Flickr account, you have two options for doing this; through Flickr's blogging tool or using Blogger's photo upload feature. So go ahead, explore the site and have some Flickr photo fun and if you're interested in looking at some photo hosting sites, then check out Picasa Web Albums from Google and another service called Smugmug.
PS: A quick word about photo posting etiquette - When posting identifiable photos of other people (especially minors) get the person's permission before posting their photo in a publicly accessible place like Flickr. Never upload pictures that weren't taken by you (unless you have the photographer's consent) and always give credit when you include photos taken by someone else in your blog.
Discovery Resources:
· Flickr Learn More tour (6 steps)
· Mediamazine Flickr Tutorials
· Flickr: Popular tags Interesting- Last 7 days
· Flickr Services (3rd party applications & mashups) and here's another Flickr site that lets you create movie posters, CD covers, magazine covers and so on.
· libraries that Flickr or 365 Days of Library Pictures in Flickr.
[Note: When you post about Flickr, please remember to include the THING# in your heading posts.]
#3 Share your blog
If you’ve made it this far, you already have two items or “things” completed of the ’7 Things.’ We hope you are enjoying the adventure so far and having fun.
Remember to share with colleagues knowledge or experience that may help them out if they get stuck or vice versa!
How do you share? Well by visiting each other’s blogs and leaving comments. This means you have to find them first. So, here’s Thing #3 – add a comment to this post and copy & paste your blog address there. Remember … your blog address is in the format http://insertname.blogspot.com/
It’s really that easy and just think, now there’s only 4 more things to go. :)
Tip! For a quick way to copy & paste information, use these key combinations, Ctrl +C and then Ctrl+V.
Optional: Create a link list as a new page element on your own blog and add the addresses of the others’ blogs to your Blog Roll.
#2 Create your own blog, then post about it
Now that you’ve done some exploring around this website and understand how this program will work, it’s time to set up your very own personal blog to begin recording your thoughts, discoveries, and exercises. For this program, you may use any one of several free online blog hosting services including Blogger, Wordpress, or Typepad. (Although we are recommending Blogger, you may find that your organisation may block websites with the name "blog" in them or itt may have a preferred blog service.)
Grab yourself a blog in 3 steps:
1. Create an account.
Google asks you for an email address - this becomes your username. Use the Gmail address you set up earlier.
2. Name your blog
Remember that the whole web world can see your blog title and blog address. You probably don’t want to use your real name. Consider creating a blog name that’s anonymous, yet uniquely you. The URL for your blog will look like these examples - http://librarywriting.blogspot.com/ or http://preilly.wordpress.com/ or http://librarianinblack.typepad.com/ (these are real blogs so of course you need to give your own blog its own unique name.) The format is name.blogspot.com when you use blogger.com software. Note: There are no www in the address when using Blogger.com software. Please remember your URL address and/or bookmark it.
3. Select your template.
Blogger has several templates - have fun choosing one for you! If you run into problems, check out Blogger's Help file and Tutorial
Discovery Exercise:
1. Set up a blog for yourself through Blogger.
2. Play around and add a test post or two.
3. Take a look at the Template tab. Try adding some page elements to your blog.
4. You will create a discovery post for each of the ’7 Things.’ Please clearly label each entry in your blog in the following way: Week 1, Exercise or Thing #1, subject. Each of your posts should provide insights into what you’ve discovered and learned. Feel free to share what worked for you … and what didn’t … what surprised you … what frustrated you … what amazed you.
For example: Your ‘Thing 2’ post will talk about how difficult or easy you found it to set up your blog.
#1 Open a Gmail Account
Your first Thing is to open a Gmail account if you don’t have one yet. Gmail is a free email service provided by Google, built on the idea that email can be more intuitive, efficient, and useful. And maybe even fun.
Please be sure to record your username and password. Unfortunately no one can retrieve these for you.
Discovery exercise
1. Set up a Gmail account
2. Send an e-mail to the persons sitting around you.
3. Once you've received a few e-mails, try some different ways of sorting and finding messages using Gmail.
Subscribe to:
Comments (Atom)